How does PALS work?

Architecture of the PALS system and communication channels.
The instructor can view all of the screenshots generated by the student stations via a web portal and able to select a station and stream the student content to large LCD displays placed through the classroom. Both the student and instructor stations are based on Linux and FFMpeg is used for video processing and streaming. The following picture shows the structure of PALS system. Additional details on the architecture of PALS are contained in "Supporting Active Learning through Commodity and Open Source Solutions".
Student Station

Content from a student device is mirrored locally. Larger classroom displays can mirror local content.
Classroom Display
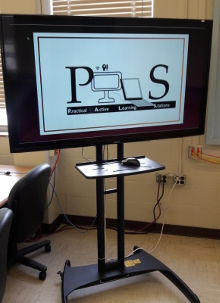
A classroom display on a cart. Instructor selected content from student stations are streamed to these displays.
Instructor Station
The instructor station is the control center of a PALS classroom and hosts the WebUI. The instructor may attach a keyboard, mouse, and monitor/projector to the station and access the WebUI via local web browser, or they may connect remotely from a personal device. Through the WebUI, the classroom displays are directed to connect directly to student stations to stream content. Since the content does not pass through the instructor station, a lightweight computing device such as a Raspberry Pi can serve as the instructor station. The WebUI itself is a basic web app running on Node.js. Student stations advertise themselves by sending screenshots and some status metadata, which the server forwards to connected WebUI clients. Clients may browse and save screenshots as they arrive. They may also nominate to share the live video feed from one student station with the entire classroom. The WebUI operates on a mostly RESTful API, with websockets used to push update notifications from the server.
Building a PALS System
With PALS it is possible to implement the functionality of a traditional, active learning classroom at a fraction of the cost. This is due to the flexibity of the PALS system, its hardware requirements and its reliance on open-source, community licesed software. Software configuration on PALS components is accomplished through a combination of Puppet manifests and Bash scripts. These scripts are available by request by contacting Dr. Jesse Eickholt.
Components
Student Station
- Magewell USB Capture Device (P/N 32011)
- Gigabyte GA-J1900N-D3V Motherboard w/ 8 GB RAM and 2.5 HDD
- M350 Enclosure with PicoPSU-80 and 60W adapter KIT
- M350 Display Brackets for Monitors/TVs
- LCD with VESA mount AND stand (e.g., Dell-E2316H)
Instructor Station
- Raspberry Pi 3 w/ 32GB SD card
- Enclosure
- USB power toggle
Installation Sequence for Student Station
Note that the following represent steps that can be taken to configure a PALS student station. These steps led to a configuration that was suitable to the classroom and IT setting used in the study. As always, the specifics will depend on your classroom and any local or institutional IT policies. When in doubt, contact your IT office. Please contact us via email for the Puppet manifests needed to complete configuration.
1. Install a minimal version of CentOS 7. Set the hostname as appropriate (e.g., PALS-1).
2. Update the system and reboot.
# yum -y update
3. Install some tools helpful for installing and maintaining PALS.
# yum -y install wget git vim kernel-devel
4. Install X windows, MATE and the kernel development tools. The development tools are needed to compile and install a loopback video driver.
# yum -y groupinstall "X Window System" "MATE Desktop"
5. Install the Puppet repo.
# rpm -ivh https://yum.puppetlabs.com/puppetlabs-release-pc1-el-7.noarch.rpm
6. Install Puppet Agent
# yum -y puppet-agent
7. Create a directory and unpack the puppet manifests.
# mkdir -p -m 775 /opt/PALS/puppet && tar -xvf pals-puppet-manifests.tar -C /opt/PALS/puppet
8. Apply the manifests from /opt/PALS/puppet.
# /opt/puppetlabs/bin/puppet apply /opt/PALS/puppet/users.pp
# /opt/puppetlabs/bin/puppet apply /opt/PALS/puppet/pals-repos.pp
# /opt/puppetlabs/bin/puppet apply /opt/PALS/puppet/pals-devel-packages.pp
# /opt/puppetlabs/bin/puppet apply /opt/PALS/puppet/mdns.pp
# /opt/puppetlabs/bin/puppet apply /opt/PALS/puppet/v4l2loopback.pp
# /opt/puppetlabs/bin/puppet apply /opt/PALS/puppet/udev-rules.pp
# /opt/puppetlabs/bin/puppet apply /opt/PALS/puppet/pals-services.pp
# /opt/puppetlabs/bin/puppet apply /opt/PALS/puppet/lighttpd.pp
9. Open ports as needed or disable firewall if running on a private, PALS only network.
10. In order to install the video loopback device, disable SELinux. This can be done by editing the /etc/sysconfig/selinux file and setting SELINUXTYPE to permissive.
11. Reboot and then install the loopback device.
# /opt/PALS/build-v4l2loopback.sh
Next Steps
What's next? Once you have your PALS classroom up and running, please send us a photo so we can add your PALS equipped classroom to our digital display case! If you have questions about PALS, please consult our FAQs and contact us as needed. Our aim is to increase student access to active learning and active learning technology.